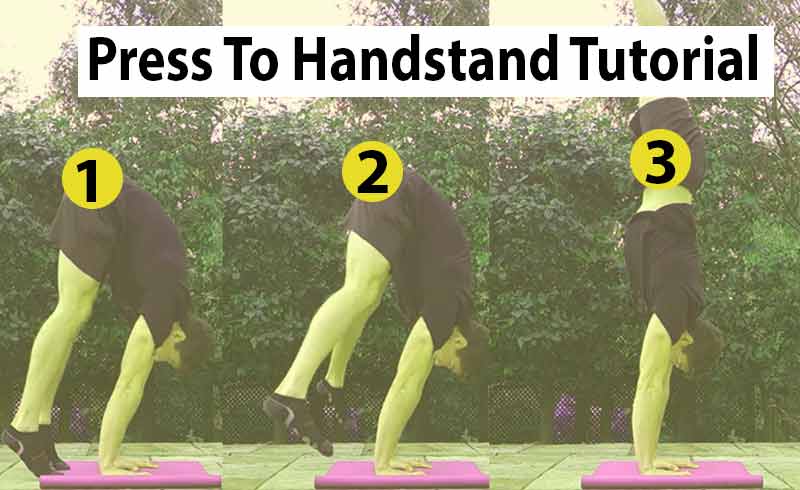
The press to handstand requires a combination of strength, flexibility, and technique, making it a challenging calisthenics move.
Unlike the kick-up handstand which relies on momentum for executing it, the press to handstand demands controlled movements and deliberate muscle engagement.
Initially appearing daunting, with consistent practice and proper guidance, anyone can master this movement.
In my experience when we’re talking about most people I think this step-by-step guide on handstand press progression will work just well.
Generally, in this article we will go over these elements:
- Handstand press requirement
- Press to handstand progression (how to do press to handstand?)
- How to do a press handstand from sitting
Here’s a table providing specifications for the “Press to Handstand” exercise:
| Exercise | Difficulty Level | Equipment Needed | Target Muscles | Description |
|---|---|---|---|---|
| Press to Handstand | Advanced | None | Shoulders, Triceps, Core, Upper Body | Start in a pike position and press up into a handstand position. Maintain balance and control throughout the movement. |
Press to Handstand: Step-by-Step Guide
Requirements for Training Press to Handstand:
Now, let’s move on to discussing the necessary requirements that must be met before embarking on training for the press to handstand.
I believe that there are two fundamental prerequisites that apply to most individuals.
1. Be able to balance the handstand for enough time
The first and foremost requirement is the ability to persistently balance a handstand for approximately 10 to 15 seconds.
The reason why consistency is emphasized in handstand drills is that balance is vital for their execution. If we are not consistent, our balance will be greatly affected.
Consequently, our practice of the press to handstand will be inconsistent and rather frustrating. Therefore, it is advised to work on improving your balancing skills first if you expect to succeed in executing a flawless handstand press.
And if you’re focusing on your handstand, feel free to check out my complete guide on how to do a handstand tutorial to get you started in the right direction.
2. Master the tuck handstand
Another suggestion I would offer is the importance of possessing a proficient tuck handstand. This is due to several reasons.
Firstly, if one can execute a successful tuck handstand, it often implies that their shoulder flexibility is good.
Secondly, as the focus of a tuck handstand involves utilizing the traps and shoulder muscles, accomplishing such a move shows signs of increased strength in this area.
And finally, performing leg movements while maintaining balance during a tuck handstand contributes to sharpening skills necessary for press to handstand.
3. You must have a baseline level of strength
Now we’ll take a closer look at another significant requirement concerning the press when it comes to calisthenics which is the distinction between strength and flexibility.
The press to handstand demands strength, rather than flexibility, making it a strength move instead of a flexibility move.
To be able to do the press movement, no matter how flexible you are, it is necessary to enhance your strength, However, there exists an inverse correlation between one’s level of flexibility and required strength, greater flexibility necessitates less strength.
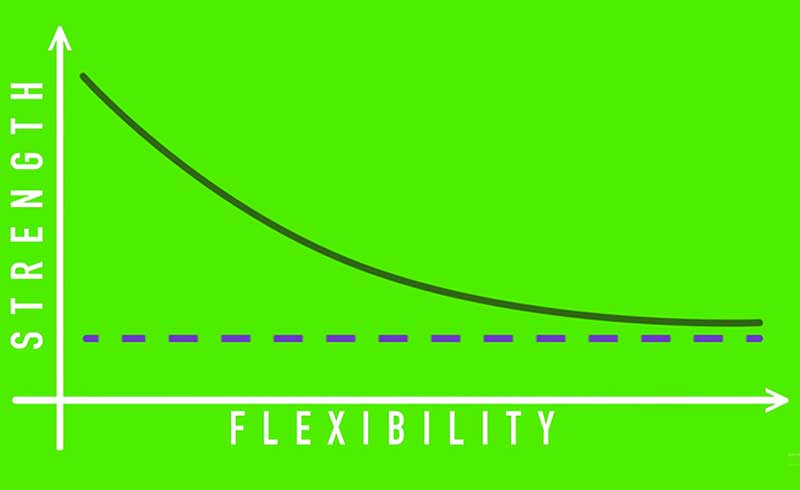
Nevertheless, a threshold amount of strength is still obligatory. more flexibility cannot bypass this fundamental need for strength.
An excellent example of this is highlighted in my personal experience, specifically, during my first ever press to handstand. Despite lacking effective flexibility, I was able to execute the action due to my considerable strength.

Admittedly it may not have been a perfect and polished achievement at that point. nonetheless, over time and with an increasing level of flexibility training, the progress has become much smoother and more refined.
To start your training of the press to handstand, ensuring that those requirements are in place is essential. In simple words, if you have taken care of those elements, commencing with the training process will be a cakewalk.
How to Do a Press Handstand: Exercises and Drills
Now that we’ve covered the initial matter, let’s shift our focus to training for the press to handstand exercises.
First and foremost, it’s important to lay down a foundation with some preparatory drills. These exercises will aid in your progression to achieving a press handstand, especially if you haven’t yet met the requirements I listed earlier.
Consider incorporating these drills into your post-workout routine a couple of times each week. doing so, you can assist in shoulder preparation and building strength for smoothly executing the first part of the preparation.
1. Range of motions you need to develop
Enhance pancake and pike flexibility
In order to effectively improve your ability to perform the straddle, it is crucial to focus on enhancing both pancake and pike flexibility.
Thus, most individuals tend to start their journey toward mastering the handstand press by first working on their straddle.
For this reason, I highly suggest investing time into perfecting your pancake and pike flexibility for optimal results with the straddle exercise.
Improve your overhead flexibility
As previously mentioned with the tuck handstand, having good overhead flexibility can enhance the efficiency of your press. Therefore, it is important to work on improving your overhead flexibility for optimal press to handstand success.
My suggestion would be to perform your flexibility routine twice a week. This will allow for proper stretching of lower body muscles like the pancake and pike stretches, especially if you do them prior to your press training session.
By doing the stretches in this sequence, it can increase the range of motion further and complement your training.
When it comes to maintaining overhead flexibility, my approach would be to perform some preparatory exercises beforehand. However, I wouldn’t overdo it as doing so might negatively impact my strength and coordination.
2. Press to handstand exercises and drills
Now, we should direct our attention toward the practical exercises aimed at achieving a successful press to handstand.
Strengthen your traps:
As I briefly touched upon earlier with the tuck handstand, the trapezius muscles play an incredibly crucial role when executing a press.
In handstands, these muscles essentially take on the same role as our gluteal muscles do when we’re standing upright. This means that they are essential for shoulder stabilization and serve as a major contributor to building muscular strength in that area.
To build your trap capacity, I have two drills that will help you.
1- The support pike slides

This drill is helpful for comprehending the upward rotation of the scapula, which is vital for any overhead pressing movement, as well as understanding how your arms should be positioned above your head.
It is also fundamental for learning handstands in the challenging position of pushing into shoulder flexion while pulling the hips into flexion.
This drill’s effectiveness is that it helps when pulling the legs which requires an emphasis on pushing up through the shoulders for maximal elevation. We should aim to feel as though we are loading the traps, while simultaneously attempting to maintain a light stance on our feet.
During this drill, we’ll hold the top position for a brief moment to focus on pushing up through the shoulders and feeling the traps engage. Afterward, we will repeat.
2- The handstand trap 3 raise:
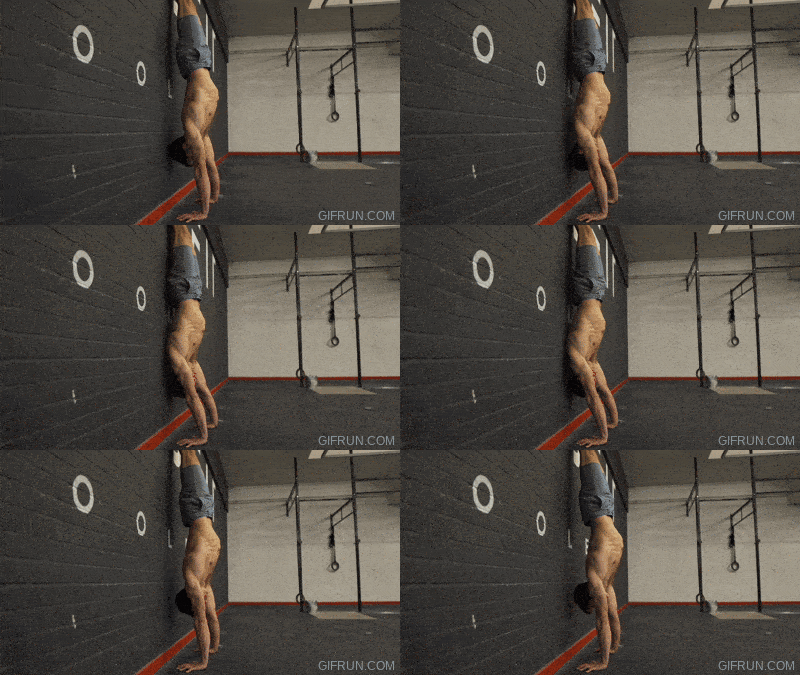
I would suggest the Handstand Trap Three Raise as a second drill to help address improving your upper range. This drill can provide some additional assistance in building strength and control for this particular movement.
The trap three raise is an exercise that is utilized for weight training, mainly focusing on enhancing the mid to lower traps.
It is certainly a good form of workout, but when it comes to handstands, we need more specificity and precision. Thus, we are going to perform a similar range of motion in the handstand for this particular exercise.
In terms of personal preference, I enjoy using the back support like a wall for this exercise. The main objective is to focus on breaking the shoulder line and pushing back with the help of your traps ultimately leading to straightening out.
It’s important to recognize that as you move further away from the wall, this task becomes more difficult as it requires you to lean even further into a planche position
To execute this properly, our main focus should be on maintaining control. As we approach the wall, it’s crucial that we aim to lower ourselves slowly and cautiously.
Priority must be given to our shoulders, during this process, they should come in contact with the wall before any other body part. Upon reaching that point of contact with the wall, hold for just one second before starting to push back off again.
Our attention must now shift towards engaging our traps fully while pushing through successfully against gravity.
To build shoulder capacity, aim to perform this exercise for 3-4 sets consisting of about 4-8 repetitions. If you are able to do more, that is great!
However, our focus is on developing strength and endurance in the shoulders so it’s important to approach this exercise much like any other strength workout.
Consider incorporating this exercise a couple of times per week at the end of your handstand practice routine. Try selecting one, or even both exercises if they complement one another well.
3- The negative handstand press:
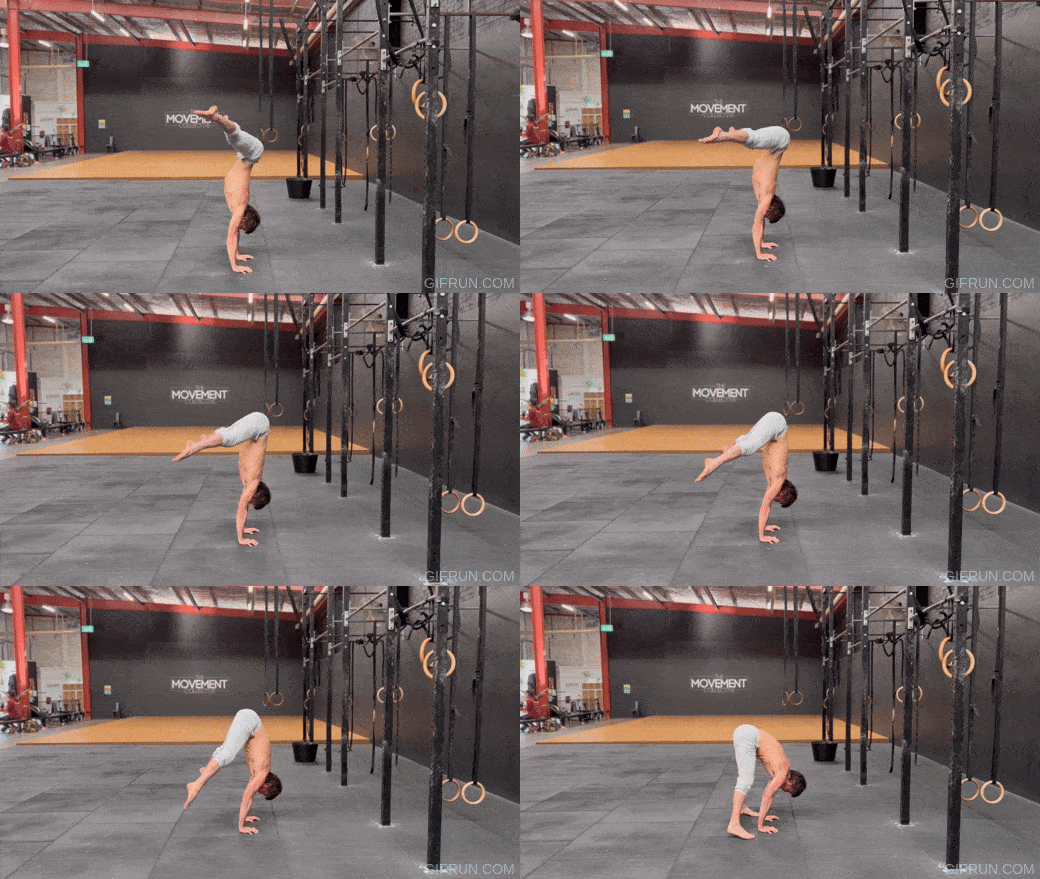
To start off, I’m going to introduce folks to the negative handstand press.
And let me tell you why “negative” is the way to go. Firstly, it makes you stronger, this increases your strength and allows for greater control of the movement compared to just trying to lift off from the ground.
Secondly, engaging in this type of negative press enables one to learn and understand the proper pattern of executing a handstand press.
In order to effectively develop the negatives, it is ideal to last around 10-15 seconds. During this time, it is important to significantly slow things down and focus on avoiding breaking the shoulders as long as possible.
Additionally, pulling the legs down tightly towards the body should be sustained until a point where it becomes hard to hold yourself in that position.
By practicing this exercise, our control will improve and we’ll be able to go even lower with each attempt.
Ultimately, with enough practice under our belt, we may be capable of controlling our descent all the way to the ground! Of course, it’s crucial that we’re patient and master this fundamental skill before attempting more complex movements.
4- The box press:
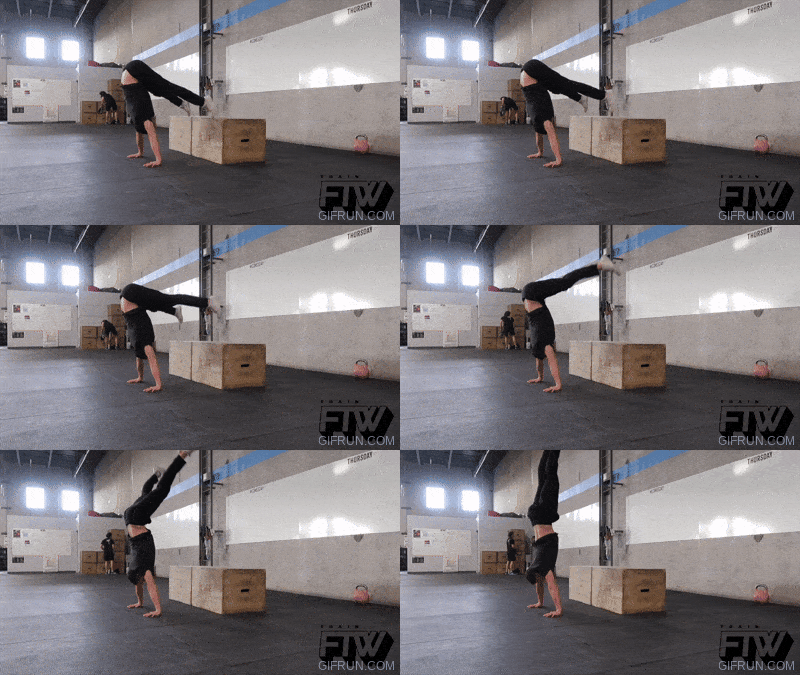
It’s possible that you’ve encountered the box press drill in the past. However, I have a few suggestions and insights that could put this technique into clearer perspective.
Additionally, I can offer guidance on how to refine your approach to achieve even more impressive outcomes.
The box press is a practice that limits the range of motion in our hands when pressing.
As we lower the box, the pressure on our wrists increases and raises the difficulty level to execute it properly.
By using blocks to elevate our feet, we can modify and progress toward mastering the press to handstand.
Gradually decreasing the height of the block will allow us to achieve this challenging movement right on the floor.
In order to achieve more benefits with this drill, there are a couple of essential keys to keep in mind.
Firstly, it is crucial to avoid jumping during the exercise. If you find yourself having to use your feet to jump and get into a handstand position, then what you’re doing is not considered as pressing, but rather an inappropriate jump that indicates an excessively low surface.
If we aim to press into a handstand, it’s crucial to direct our attention towards the shoulders as they play a vital role in controlling the movement. As we lift our legs up, our shoulders serve as the point of origin for this action.
Secondly, you have to concentrate on moving your hips over first. When doing the box press, it is important to have someone pull our hips over our shoulders, allowing us to push up with strength through the shoulders.
Once you are in this position, begin pressing and attempting to lift your feet off of the ground.
Attempting to lift from a lower hip height would require more effort and ultimately hinder our progress rather than help it.
As previously mentioned, training for this particular exercise can be quite challenging to achieve a sufficient amount of volume.
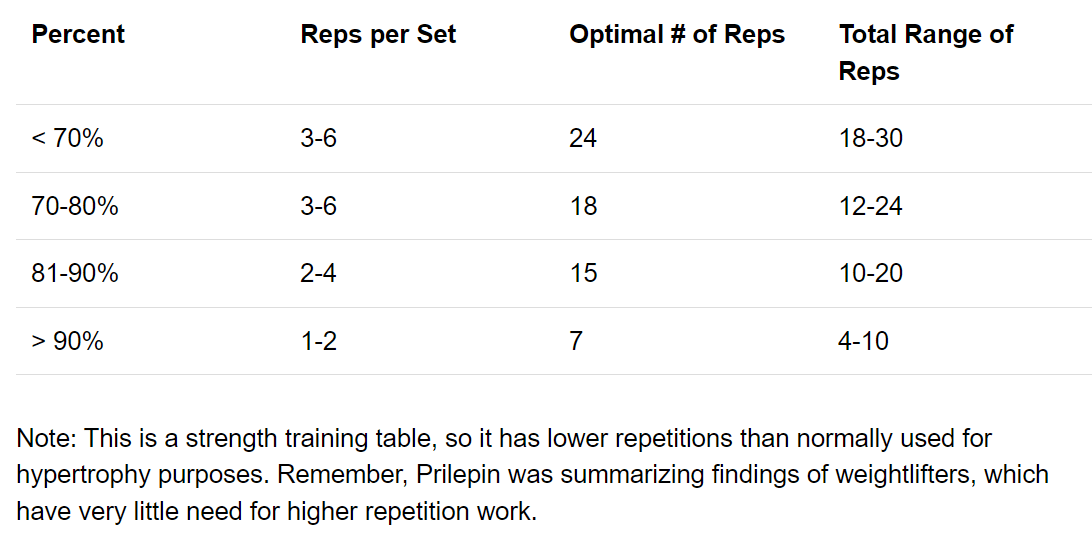
As it pertains to strength moves, I would advise referring to Prilepin’s chart for guidance on the optimal range of repetitions.
In order to effectively train for increased strength, we should aim for approximately 10-25 reps per session.
It’s important to note that the volume of this exercise should be taken into consideration. The frequency at which we train it will have an impact on its effectiveness as a strength move.
As such, it is best to limit training this particular move too often in order to avoid excessive fatigue in the traps.
We recommend only training twice per week with a sufficient volume to produce successful results. Training more than that could compromise the intended strength-building effects and hinder progress over time
Conclusion:
What I would like to share with you is the significance of adding time and consistency in your drills to attain desired results.
Truth be told, developing press to handstand movement is a challenging task and requires both time and effort. It constitutes a particular kind of strength that can only be acquired through the persistent practice of both press negatives and box press routines.
Let me make it clear that achieving success with the handstand press will not happen overnight but rather necessitates constant dedication and discipline.
- Bench Press Calculator - April 22, 2024
- Press to Handstand: Ultimate Step-by-Step Guide - April 22, 2024
- Cable Press (How To Do, Benefits, Targeted Muscles, Alternative) - April 22, 2024

